
Orthographic Projection
Design Activity (4-12 Grade)
Learners will learn the concept of orthographic projections and how to draw them.
Learners will…
-
Learn the concept and mechanics of orthographic projections
-
Understand how to draw an orthographic projection of a 3D object
-
Translate 3D objects to 2D views
Share your orthographic drawings on social media with #DesignTogether and we’ll feature examples in our Design Together online gallery.
INSTRUCTIONS
-
Begin by introducing the concept of orthographic projections to your learner. Start with an example—you can use the one in the background—before moving into the definition. Ask your learner: why do we need orthographic drawings (multi-views) in addition to a 3D drawing of an object? What does an orthographic drawing show that a 3D drawing does not?
-
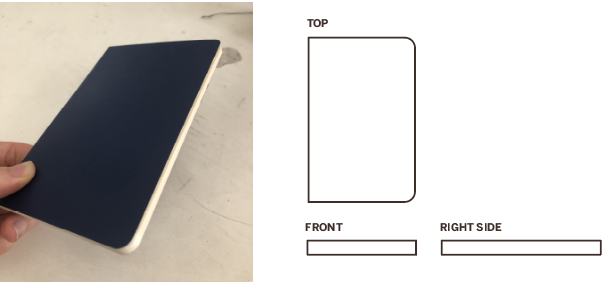
Discuss with your learner how to make an orthographic drawing. Make sure to introduce the top, front, and right side views, and show them a simple example drawing such as the one in the background. Have your learner physically look at the object from different views—look at the object from above, from the right, and from the front.
Sample Questions: How do you think the top, front, and right side views relate to each other? What is each view showing? How would you draw this? -
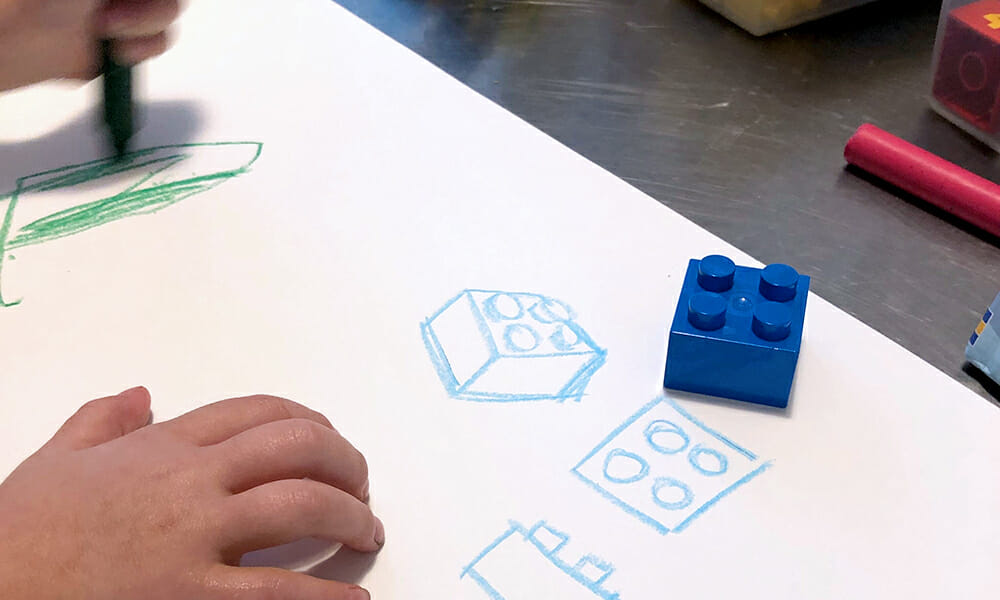
Once your learner is comfortable with the idea of orthographic drawings, it’s time to start drawing! Choose a solid, simple, geometric object for their very first drawing.
Suggestions: a book, a block of soap, solid toy building blocks. -
When your learner is finished drawing, have them show you the drawing and talk you through how they drew it. Ask your learner: what would they do if the object was hollow inside? How would they draw that? Introduce the idea of hidden lines to your learner, and how they help show parts of an object that cannot be directly seen.
Sample Questions: Why do you think hidden lines are important? How would we add hidden lines to your drawing, assuming that the object is hollow? What are some objects you can think of that would need hidden lines in their drawings? -
After discussing hidden lines with your learner, give them a slightly more challenging object to draw that would require hidden lines.
Suggestions: knife block, toilet paper roll, water bottle. -
Challenge: If your learner is up to something more challenging, have them select a more complicated object to draw. Before drawing, have them thoroughly inspect the object, or even take it apart if possible.
Ask Your Learner: How would you draw angles? How can you make sure the top view and front view match? What was drawing this object like, compared to the previous ones?
WHAT IS AN ORTHOGRAPHIC PROJECTION? WHAT ARE THEY USED FOR?
Imagine that you found a table you absolutely love, but it’s not for sale. As a result, you decide to build it yourself. In order to build it as close to the original as possible, you need to take multiple photos of it from different angles: you want a photo from above to make sure you get the table top shape right, a photo from the side to make sure you have the height and width right, etc. Similarly with engineering, architecture, and design, a 3D drawing does not show enough detail—orthographic projections help overcome that problem.
An orthographic projection is a way of representing a 3D object by using several 2D views of the object. Orthographic drawings are also known as multiviews. The most commonly used views are top, front, and right side. You can imagine it as positioning yourself directly in front, above, or to the right of an object and drawing only what you can see.
LINES
What happens when you need to show something that can’t be seen? For example, if you had a hollow box, how would you show in your drawings that the box is hollow?
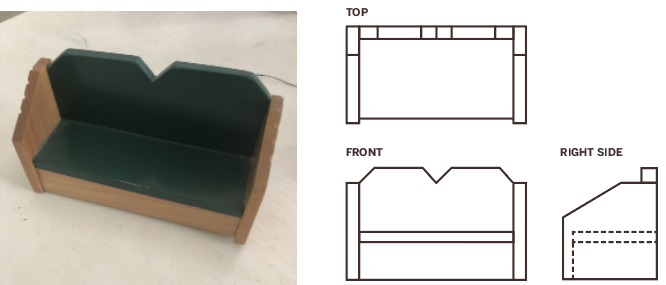
Engineers and designers use hidden lines to show parts of an object that can’t be seen directly in a specific view. Hidden lines are characterized as dashed lines (rather than solid). Look at the orthographic drawing of a dollhouse couch below: where are hidden lines being used, and what parts of the couch are they showing?
In this case, the hidden lines show the outline of the couch cushion, making clear that the space directly behind the arm rest portion is just air. Hidden lines allow for more clarity, and make it easier to envision the depth, height, or angles of different parts of an object.
TIPS
- Make sure the length and width of everything in your views match! For example, if you are making an orthographic drawing of an armchair, you want the width of and between the armrests to match in both the top and front views. You can sketch guiding lines between the views to help do this.
- Before you draw any detail, sketch boxes for each view first (making sure that they match properly in height, width, and depth). Then “carve” the box to include the details of the object you are drawing.
- If you would draw a line to represent an angle or feature on the 3D version of the object you are sketching, then you should do the same for the orthographic view.
Download a printable version of the entire activity.